
Many facility managers assume that if a door opens, it's fine. That assumption misses the route leading to the door, the hardware inside it, and the fire-rated components that keep smoke and flame from spreading. This checklist walks through what to observe, how to document it, and when to call in a qualified fire-door professional.
This article is written for U.S. facilities and general-industry guidance. It does not replace OSHA standards, your adopted building and fire codes, your local authority having jurisdiction (AHJ), or formal NFPA80 inspection and testing procedures.
Key Takeaways
- Inspect the entire route to the exit (approach, doorway, and discharge), not just the door leaf
- Confirm clear access, working hardware, correct locking, visible signage, and a clear discharge path
- Fire-rated doors need self-closing action, full latching, intact labels and seals, and no field modifications
- Log every door by location or asset ID and assign a corrective action instead of a vague pass/fail
- Routine checks catch visible problems; certified pros handle formal fire-door testing and repairs
What You Need to Check in an Emergency Exit Door
Before you walk a single hallway, map out the work. Identify every required exit door in the building and the route that leads to it. Pull the facility's current door schedule and evacuation procedures, and confirm the assigned inspector is actually trained and authorized to perform these checks.
Skipping this step is how inspections miss doors entirely, especially in additions, renovated wings, or storage areas nobody walks through daily.
Tools and Inspection Information Required
Keep your kit simple and non-destructive. You're documenting conditions, not repairing hardware.
- Current floor plan or egress map showing primary and secondary routes
- Door or asset ID list matching the facility's numbering system
- Flashlight for frames, thresholds, and dim stairwells
- Inspection form or digital device for consistent recordkeeping
- Camera for photo evidence of defects
- Basic measuring tools where applicable (not force gauges, unless trained to use them)
- Basic PPE appropriate to the area being inspected
Avoid tools that could pry, drill, or otherwise damage hardware or compromise a rated assembly. A visual check should never leave marks.
For every door, record:
- Building, floor, room or zone, and door ID
- Date, time, and inspector name
- Door type and observed condition
- Photographs and any immediate action taken
- Assigned owner and follow-up date
A door without a follow-up date is a finding nobody owns.
Preconditions and Setup
Time the inspection for a safe operational window. Coordinate with occupants, security staff, and facilities before touching anything connected to access control, alarms, or fire-protection systems. Disabling any of these without authorization creates a new hazard while you're trying to fix an old one.
Make sure you can actually see what you're inspecting:
- Both faces of the door
- The full approach path
- The frame, threshold, and hardware
- The discharge area beyond the door
Furniture, stored equipment, security add-ons, or temporary construction barriers often hide the very conditions you're there to catch. Your inspection boundary should run from the occupied space, through exit access, through the door itself, to the discharge point, with any condition beyond your expertise flagged separately for specialist review.

Methods to Check an Emergency Exit Door
A single glance at a door tells you almost nothing useful. A layered approach — walking the route, inspecting the assembly, running an authorized operational check, and documenting what you find — gives you a result you can actually trust.
Walkthrough and Visual Route Check
Walk the route exactly as an occupant would during an evacuation. Confirm the approach, corridor, stairwell, ramp, threshold, doorway, and discharge area stay continuous and visible from start to finish.
Watch for:
- Stored materials, carts, or equipment blocking the path
- Cords, hoses, or trip hazards across the floor
- Waste, snow, or ice at exterior discharge points
- Anything concealing or obstructing the door itself
OSHA's exit route standard defines this as one continuous, unobstructed path — exit access, exit, and exit discharge together. Inspecting only the door and ignoring the hallway leading to it misses most of what the regulation actually covers.
This method works well for routine staff inspections and catches everyday operational problems fast. It won't reveal concealed hardware defects, confirm fire-rating performance, or verify code-specific dimensions — those require closer inspection or specialist evaluation.
Door, Frame, and Hardware Inspection
Now look at the assembly itself. Examine the door leaf, frame, hinges or pivots, closer, latch, panic or exit device, glazing, threshold, seals, protective plates, labels, and visible fasteners.
Check both faces and both edges of the door, not just the side facing the corridor. Look specifically for:
- Holes, cuts, or field alterations not matching the original assembly
- Missing or illegible fire-door labels on the door and frame
- Damaged or missing gasketing and seals
- Hardware that looks incompatible or improperly installed
- Loose hinges, misaligned frames, or corrosion
Record the exact component and its location for each defect — "hinge side binding at mid-height" beats "door sticks."
This step catches what a route walkthrough misses entirely. But a visual check is not certification. It's not permission to repair, adjust, or swap out listed hardware without the right training — doing so can void a door's fire rating without anyone realizing it until it matters.
Authorized Operational Check
Using your facility's approved procedure, verify that the door opens from the egress side without a key, special tool, or unusual effort. OSHA's egress rules require inside release without keys or special knowledge — that's a baseline, not an aspiration.
To run this check:
- Notify occupants or monitoring personnel before you start
- Operate the door in its normal direction of egress
- Watch for binding, sticking, delayed latch release, or excessive closing force
- Confirm the door closes and latches fully where required
- Restore the door to its normal secure state and log the result

Never cycle a visibly damaged assembly repeatedly to "see if it works." That's how a borderline hazard becomes an active one. Skip formal force testing unless you have the correct equipment and training — and never defeat an alarm or access-control system to complete this step.
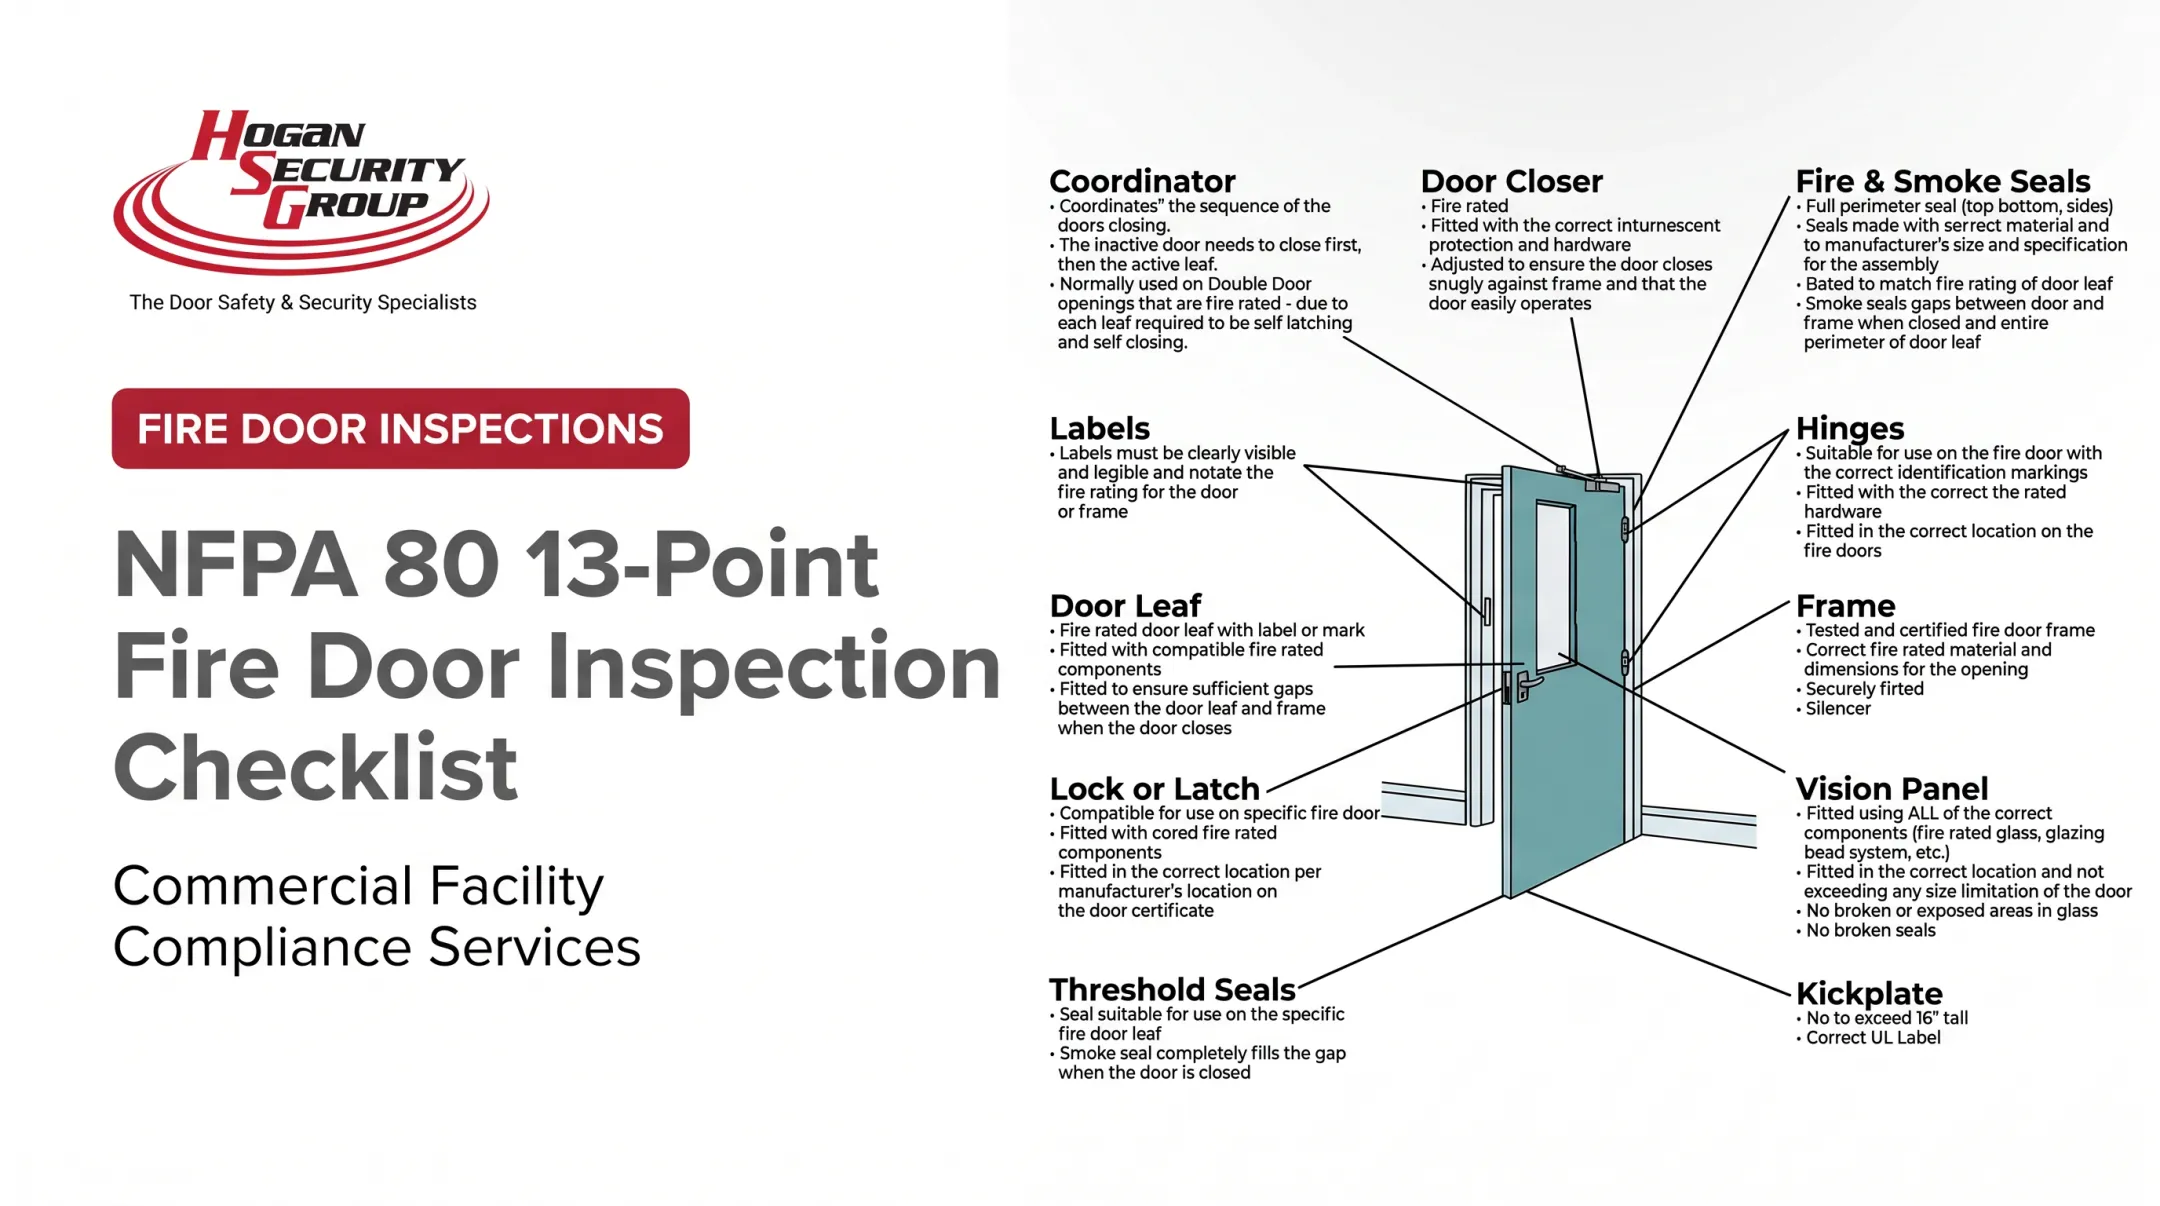
When a fire-rated or emergency exit assembly won't close, latch, release properly, or shows visible damage, that's the point to bring in a qualified fire-door inspection and repair provider. Hogan Security Group's team includes certified fire door assembly inspectors (FDAI), and their checklist process for NFPA80-rated doors covers more than 20 diagnostic points per opening, well beyond what a routine walkthrough is designed to catch.
How to Interpret the Results
A checklist result should always lead somewhere. "Passed" should mean you actually observed the condition within your inspection's scope — not that you assumed it was fine because nothing looked obviously wrong. Anything uncertain, inaccessible, or technically complex gets flagged for review, not waved through.
Normal or Acceptable
Mark a door acceptable when the full route is clear, the door is identifiable and reachable, hardware operates correctly through your approved basic check, the door returns to its required closed position, signage is visible, and there's no obvious damage, obstruction, unauthorized lock, or fire-door alteration.
Even with no defects found, record the date, inspector, door ID, scope, and supporting evidence. Future inspectors need that baseline to spot recurring patterns — a door that "barely passes" every quarter is telling you something.
Minor or Correctable Issue
These are conditions that don't immediately block egress but need prompt attention:
- Partially obstructed approach (a stacked pallet, a propped cart)
- Faded, obscured, or missing signage
- Loose noncritical trim or hardware
- General housekeeping concerns near the door
Assign the repair to a responsible person with a due date, attach photos, and perform a closeout check once it's fixed. Don't just delete the original finding — closing the loop with evidence is what makes the record useful later.
Out-of-Specification or Urgent Finding
Some conditions demand immediate escalation under the facility's emergency plan:
- A blocked or unusable exit route
- A door that won't open from the egress side
- An unauthorized lock preventing evacuation
- A damaged fire-rated assembly
- A door that won't close and latch where required
When you find one of these, protect occupants first, notify the responsible manager or authority as your plan requires, arrange qualified evaluation, and document any temporary control you put in place. Every facility and jurisdiction handles "out of service" differently — don't assume a universal rule applies where your local code or AHJ says otherwise.

NFPA's inspection checklist is explicit that documenting deficiencies isn't the same as certifying assembly compliance. A routine pass tells you the door looked fine today — it's not a substitute for formal fire-door testing.
Common Errors, Safety and Best Practices
An unlocked door isn't automatically a compliant door. Route clearance, hardware function, signage, discharge conditions, and fire-door features all have to check out together: passing one doesn't excuse skipping the rest.
Common mistakes to avoid:
- Inspecting only the corridor side and never checking the far side of the door
- Relying on a single "it opens" test instead of a full operational check
- Overlooking the frame and threshold entirely
- Ignoring how access-control hardware might be interfering with egress
Never:
- Prop open a fire door or remove its closer
- Adjust panic hardware without manufacturer or professional guidance
- Drill, cut, or modify a rated assembly
- Reset an alarm system without authorization
Before you start:
- Keep basic PPE on hand
- Hold a stable position clear of the door's swing path
- Keep occupants out of that same path
- Coordinate with security and fire-alarm monitoring staff
If a real emergency happens mid-inspection, the checklist waits.
Schedule extra inspections beyond required annual testing after events that can change door condition or hardware:
- Renovations and tenant fit-outs
- Hardware changes or security upgrades
- Severe weather events or large deliveries
- Repeated complaints about a specific door
A consistent digital workflow that tracks repeat failures by door, building, component, and responsible department makes patterns visible across multiple sites instead of hiding them in separate paper files.
Conclusion
Reliable exit door inspection depends on five checks working together: a clear route, functioning hardware, an intact door assembly, visible signage, and documented follow-up. Skip any one and the others don't matter much.
Routine checklists are built to catch visible conditions. They're not a substitute for formal fire-door inspection, testing, repair, or sign-off from a qualified professional and your local authority having jurisdiction. When a door's life-safety or fire-resistance function is in question, that's the moment to hand it to someone certified to answer it.
Assign every finding to a person and a date. Fix urgent hazards immediately. Don't let them sit in a spreadsheet. And when a door raises questions your team can't answer on-site, bring in a specialist before it becomes the door nobody can open.
Frequently Asked Questions
What are the OSHA regulations for emergency exit doors?
OSHA's exit-route standards require unobstructed, usable egress paths and doors that permit evacuation without keys, tools, or special knowledge. Building and fire codes adopted by your state or municipality may add further requirements beyond OSHA.
How often should emergency exits be inspected?
Frequency depends on your facility's risk assessment, written safety program, occupancy type, and adopted codes. Routine visual checks can happen monthly or quarterly, while formal fire-door testing under NFPA80 is generally required at least annually.
What should be checked on an emergency exit door?
Check the full approach route, door and frame condition, hinges, closer, latch or panic hardware, egress-side operation, signage, and, for fire-rated doors, labels and seals. Don't forget the discharge path beyond the door.
Can emergency exit doors be locked?
Security measures can't prevent lawful egress when occupants need to evacuate. Certain locking arrangements are permitted under specific codes and occupancy types, but these exceptions should be confirmed with your authority having jurisdiction.
When should a professional inspect or repair an emergency exit door?
Call a professional for failed hardware operation, damaged or altered fire-rated assemblies, missing labels or seals, closer and latch problems, access-control conflicts, or any condition your routine inspector isn't equipped to evaluate safely.