
That's the entire point of an NFPA80 inspection: confirming the assembly still does what its label promises. This checklist gives facility teams a practical starting point, but it's not a substitute for the current NFPA80 edition, your locally adopted code, your AHJ's requirements, or a qualified inspector's judgment on borderline conditions.
This article covers a 13-point checklist, a door-by-door workflow, documentation guidance, and how to decide when a finding needs a quick fix versus a specialist's review. It's written for facility managers, school and healthcare facility directors, commercial property managers, and anyone responsible for buildings with multiple rated openings.
Key Takeaways
- All 13 points cover labels, frames, glazing, hardware, clearances, closing, sequencing, latching, seals, obstructions, modifications, and signage
- Give each assembly its own ID and log pass, fail, or N/A with notes or photos
- Score each condition against the current NFPA80 edition, local code, AHJ, and door listing
- Test rolling steel and coiling fire doors differently from swinging doors
- Most failures stay within a normal facility budget, per Hogan 2025 field data
Tools, Access, and Preconditions for an NFPA80 Fire Door Inspection
You can't inspect what you can't reach. Every fire door assembly needs to be visually checked from both sides, according to the Steel Door Institute's technical guidance, which means clearing furniture, equipment, or storage blocking either face before you start.
You'll also need the door's identification or location record, access to its label and listing information, manufacturer instructions, and any prior inspection reports. Without that baseline, you're guessing at what "normal" looks like for that specific assembly.
Tools and Indicators Required
A basic inspection kit should include:
- Flashlight, for checking label legibility and inspecting seals in dim stairwells
- Camera or mobile device, for documenting deficiencies with timestamped photos
- Gap-measuring tool or feeler gauge, for checking clearances
- Tape measure, for door and frame dimensions
- Inspection form (paper or digital), for recording pass/fail/N/A results
- Basic hand tools, for observation only, not repairs
- PPE appropriate to the site, such as gloves or a hard hat in industrial settings
Repairs and hardware adjustments should never happen during the inspection itself unless the person doing the work is authorized and competent to make that change. An inspector who tightens a hinge screw is fine. An inspector who swaps in unlisted hardware to get a door to latch has just created a bigger problem.
Preconditions and Setup
Before you touch a door, put it in a safe inspection state:
- Control foot traffic around the opening so testing doesn't surprise anyone
- Avoid disabling any life-safety function, even temporarily, without coordinating with facility personnel
- Schedule alarm or hold-open device testing with whoever manages the fire alarm system
- Identify the assembly type before you start
That last step matters more than it sounds. A single swinging door, a paired door, a door with glazing, an electrically controlled door, and a rolling steel door each call for different checks. Running the same procedure on all of them means missing things that actually matter for that specific assembly type.
The NFPA80 13-Point Fire Door Inspection Checklist
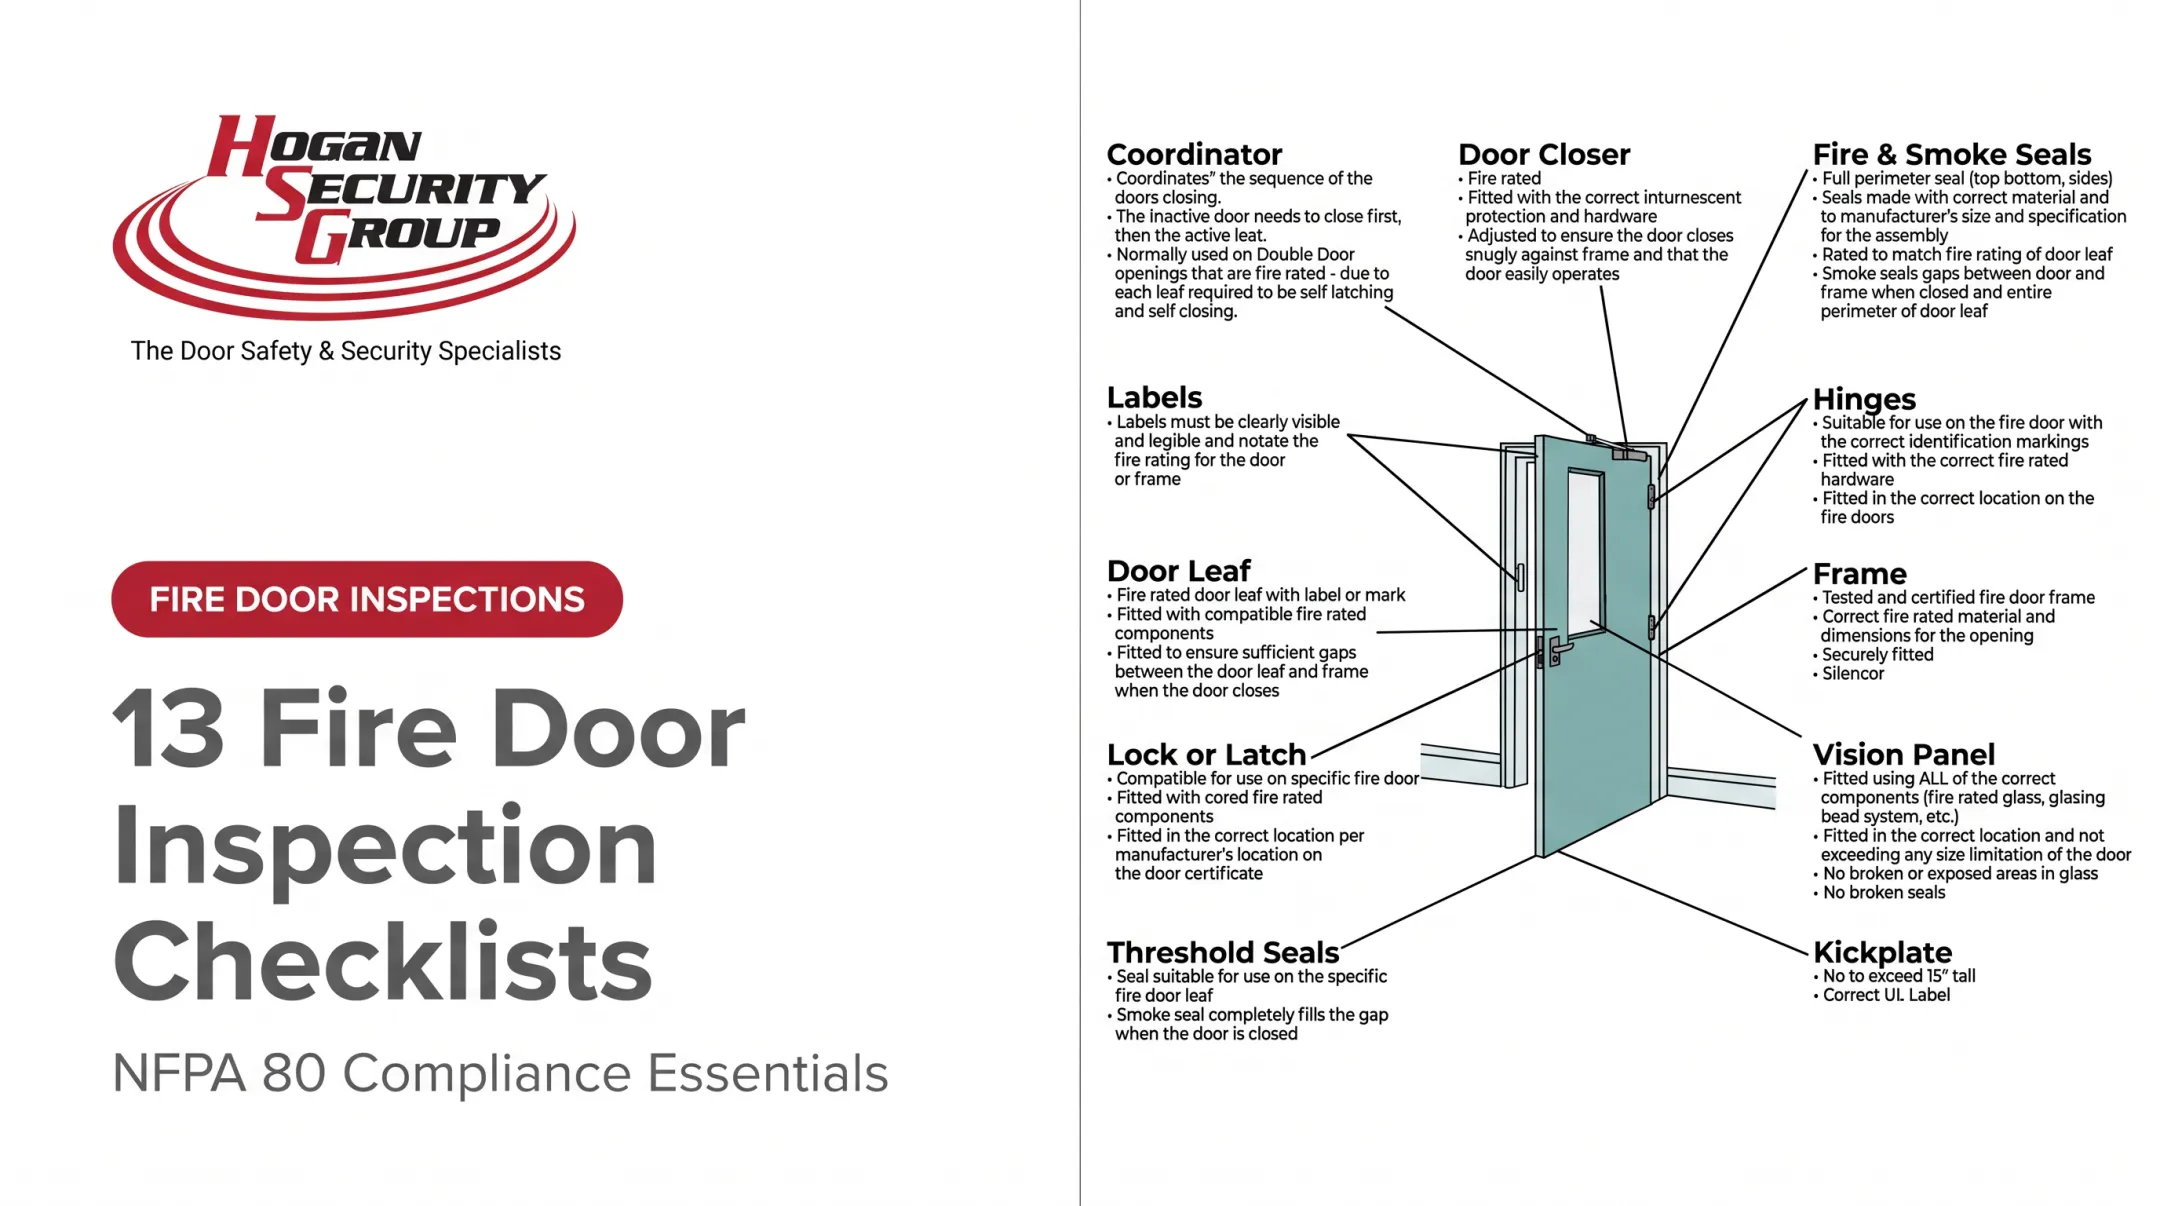
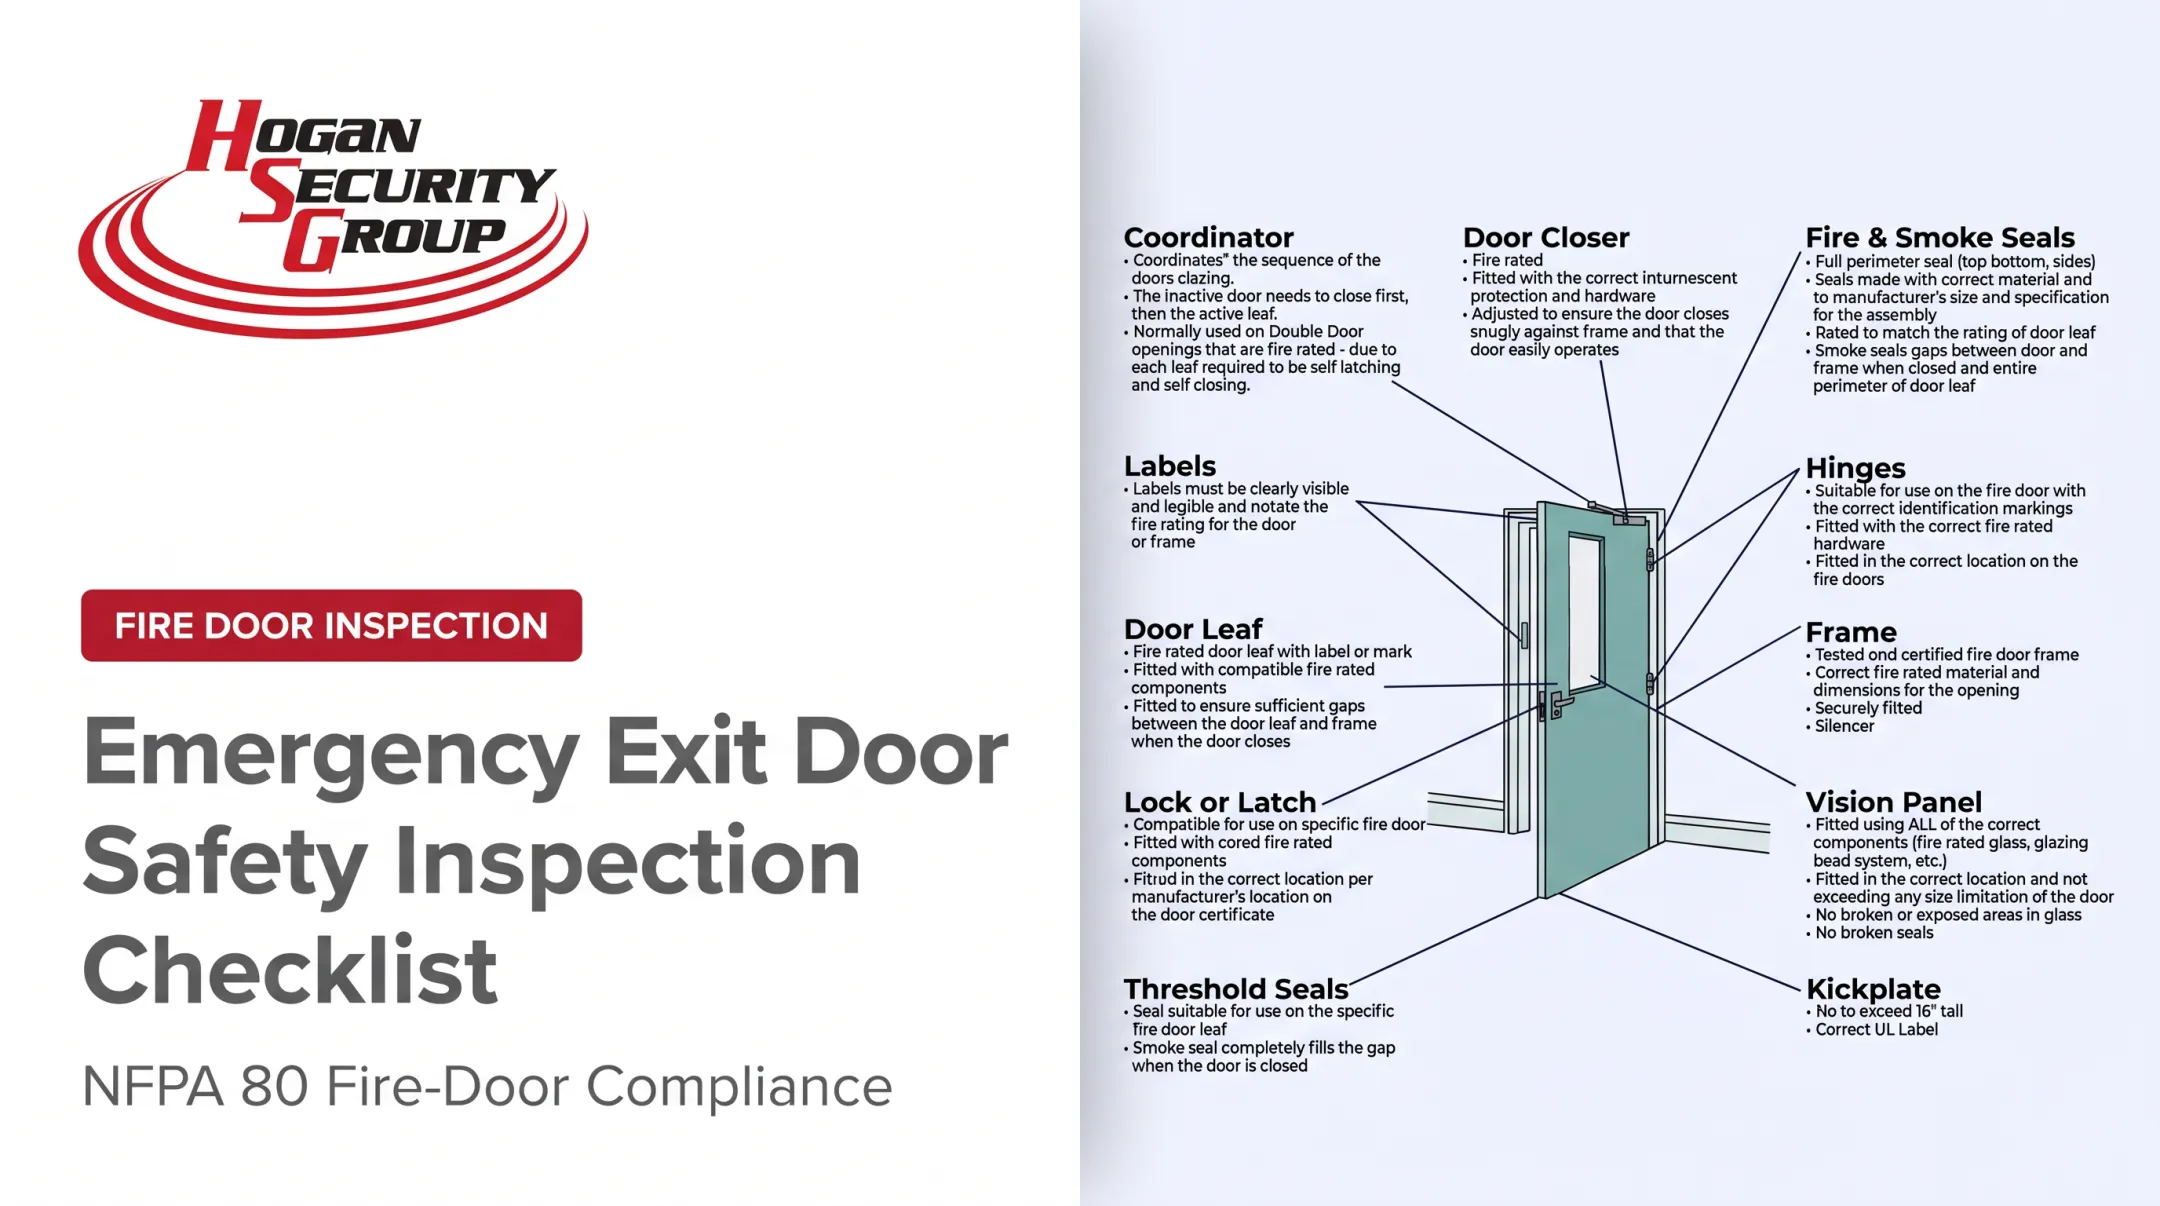
This checklist reviews the complete labeled assembly, not just the door leaf. Frame, hardware, glazing, and seals are all part of what carries the fire rating, and all of them need to hold up to scrutiny. Every criterion below should be checked against the current NFPA80 edition, the specific assembly's listing, manufacturer instructions, and whatever your AHJ expects locally.
Door and Frame Condition
Point 1: Labels. Confirm the required labels are present, permanently attached, visible, and legible. If a label is missing, painted over, altered, or impossible to read, don't try to recreate or replace it yourself. That requires qualified review, because the label is the only visible proof of the assembly's tested rating.
Point 2: Door leaf and frame damage. Look for holes, breaks, cracks, corrosion, distortion, or separation anywhere on the door or frame that could compromise fire performance.
Point 3: Glazing and vision panels. Check fire-rated glazing, vision panels, glazing beads, and surrounding trim for cracks, looseness, incorrect material, or missing identification markings.
Hardware, Clearances, and Operation
Point 4: Hardware integrity. Confirm hinges, pivots, fasteners, closers, latching hardware, flush bolts, and coordinators are present, secure, properly aligned, and undamaged.
Point 5: Clearances. Measure the gaps around the top, sides, bottom, and meeting edges of paired doors using a proper gauge, not a visual estimate. Compare against the limits that apply to that specific door type and your adopted code.
Point 6: Self-closing operation. Test whether the door closes fully and consistently from several open positions without being pushed or pulled. If hold-open or release devices are installed, test those functions too, when it's safe to coordinate with facility staff.
Latching, Seals, Modifications, and Signage
Point 7: Positive latching. The door should latch reliably when released, including both the active and inactive leaves on a paired assembly.
Point 8: Coordinator and sequencing. On paired doors, confirm the inactive leaf closes before the active leaf so the latching hardware can engage correctly.
Point 9: Seals and gasketing. Inspect smoke seals, intumescent strips, edge seals, and threshold gasketing for continuity, secure attachment, and compression damage. Gaps or missing sections here defeat the smoke- and fire-sealing function even if the door itself closes fine.
Point 10: Obstructions. Check for wedges, stops, hooks, signage, or furnishings interfering with closing, latching, or sealing. This is one of the most commonly overlooked points because a propped-open door "looks fine" until someone actually tries to close it.
Point 11: Field modifications. Watch for unapproved drilling, cutting, trimming, or added hardware. Any modification needs to be checked against the original listing or an approved field-modification procedure, not assumed to be harmless.
Point 12: Signage. Confirm required fire door signage is present, legible, correctly positioned, and matches what your applicable code calls for.
Point 13: Record everything. Record a result for every item: pass, fail, not applicable, or requires qualified evaluation. Include the door ID, location, photos, a deficiency description, and the recommended next step.

Assembly-Specific Checks
Not every rated opening follows the swinging-door checklist above.
- Rolling steel and coiling fire doors need their own release, drop, closing, and reset checks, including proof the automatic-closing device resets correctly after a drop test
- Powered operators, access-control locks, electromagnetic hold-opens, and alarm interfaces need coordinated functional testing by someone qualified on that system, not a general facilities inspector working alone
How to Perform and Document the Inspection
A repeatable workflow beats a one-off walkthrough every time. Follow this sequence:
- Build your door inventory
- Identify each assembly
- Inspect both sides
- Run through the 13 points
- Perform the functional tests that apply
- Document everything
- Confirm follow-up
Door-by-Door Inspection Procedure
Assign a unique identifier to every door, and record:
- Building, floor, and room or opening number
- Assembly type (single, paired, glazed, electrified, rolling)
- Rating information, when available
- Inspection date
Check visual components first, meaning labels, damage, glazing, and hardware condition, before you operate the door. Then move into controlled closing, latching, sequencing, and release testing.
Record pass, fail, or not applicable for every individual item, not just an overall pass/fail for the whole door. A door that passes 12 of 13 points still has one unresolved deficiency that needs tracking.
Photograph labels, damage, excessive clearances, failed hardware, and obstructions as you go.
Results, Corrective Actions, and Records
Every failed item should produce a specific corrective action: what needs fixing, who's responsible, current status, and proof the work was completed. Don't assign a universal repair deadline unless your adopted code, AHJ, or facility policy actually specifies one.
Some doors need to come out of normal service immediately if they can't close, latch, or seal at all. Others can stay in service with a documented follow-up plan. When you're unsure which category a finding falls into, escalate to your AHJ or a qualified fire door professional rather than guessing.

Your report should capture:
- Inspector name and qualifications
- Inspection date
- Door location and ID
- Individual findings per checklist item
- Photos and repair recommendations
- Completed work and facility sign-off
Record Retention and Inspection Management
Verify the current NFPA80 recordkeeping language, plus any stricter state, healthcare, education, or insurance retention requirement, before committing to a specific retention period in writing. Requirements can vary meaningfully by occupancy type and jurisdiction.
For portfolios with more than a handful of rated openings, a central register or digital inspection management system makes a real difference. It tracks annual coverage, open deficiencies, repeat failures, and completed repairs across every building, instead of relying on a filing cabinet full of paper reports.
This is also where bringing in outside help tends to pay off. Hogan Security Group arranges documented fire door inspections and the corrective work that follows, backed by Certified Fire Door Assembly Inspectors (FDAI).
For facility teams managing inspections across multiple sites in New Jersey, New York, or Pennsylvania, that single point of accountability (inspection, repair, and documentation) removes a lot of the coordination headache.
How to Interpret Inspection Results
A "pass" means the door met the criteria at that moment. It doesn't guarantee the assembly stays compliant after the next heavy impact, hardware failure, or unauthorized modification. That distinction matters when you're explaining results to leadership or an AHJ.
Normal or Acceptable Findings
These look like what you'd expect from a healthy assembly: an intact, legible label; a sound door and frame; secure hardware; clearances within range; complete seals; and full closing with positive latching. Confirm every item against that specific assembly's requirements rather than assuming a generic standard applies.
Minor or Correctable Deficiencies
Loose fasteners, damaged signage, minor hardware wear, or a small section of degraded seal fall here. Document them fully, don't downplay them just because they're minor, and assign an owner, a recommended fix, and a follow-up date based on your site's policy and AHJ expectations.
Out-of-Specification or Serious Findings
Some findings need to escalate immediately:
- A door that won't close or latch at all
- A blocked or obstructed opening
- Missing critical hardware
- Severe structural damage
- Compromised fire-rated glazing
- Failed release testing on a rolling door
- Unauthorized modifications to the listed assembly
Not every deficiency carries the same repair timeframe or consequence, so avoid treating a loose kickplate screw the same way you'd treat a door that physically won't latch. When the correct remedy isn't obvious, loop in the AHJ, the listing agency, the manufacturer, or a qualified fire door professional before making a call on your own.
Internal field data from Hogan Security Group's 2025 inspections suggests that the large majority of failures, more than 90%, fall into the correctable category and can be resolved within a standard facility maintenance budget rather than requiring a full assembly replacement.

Common Errors, Safety, and Best Practices
Most inspection failures trace back to a handful of repeat mistakes:
- Checking only the door face and skipping the frame or the opposite side
- Eyeballing clearances instead of measuring them
- Ignoring sequencing on paired doors
- Treating a quick walkthrough as a documented inspection
- Missing doors entirely because they weren't on the inventory list
Never paint over or attempt to recreate a fire door label. It voids the only visible proof of the assembly's rating. Other things to avoid: installing unlisted hardware, drilling or trimming the assembly without approval, propping doors open with unlisted wedges, and replacing fire-rated glazing or seals with non-listed materials.
A few practical safety habits go a long way:
- Control access and foot traffic during testing
- Use a stable platform and appropriate PPE, especially on ladders near heavy frames
- Coordinate alarm and hold-open testing with the people who manage those systems
- Never isolate or lock out a system in a way that compromises egress
- Leave repairs to competent, authorized personnel only
Keep a consistent photo and note-taking habit for every door, communicate serious failures immediately rather than batching them into a monthly report, and schedule a follow-up check to confirm corrective work actually restored the assembly to its listed configuration.
Conclusion
A solid NFPA80 inspection checks the whole assembly, confirms both visual condition and real operation, and leaves behind a door-specific record that holds up if someone asks questions later. That record is what makes a thorough inspection worth more than a rushed walk-through.
Use this checklist to organize your inspections and build a consistent process across your buildings. Call in a qualified specialist, and your local AHJ when needed, for situations such as:
- Complex assemblies
- Failed doors or damaged labels
- Unauthorized modifications
- Any deficiency you are unsure how to classify
FDAI-certified inspectors can classify deficiencies correctly and document the work so your openings stay defensible at the next review.
Frequently Asked Questions
What are the NFPA80 fire door inspection requirements?
NFPA80 requires fire door assemblies to be inspected and tested at least annually by someone knowledgeable about the specific door type, with a signed written record kept available for the AHJ, according to NFPA's 2025 FAQ. Exact requirements still depend on your adopted local code.
What are the steps involved in an NFPA80 fire door inspection checklist?
The process covers door identification, label and condition review, hardware and clearance checks, closing and latching tests, seal and signage review, deficiency documentation, and corrective-action follow-up. Each step builds a complete record for that specific door, not just a general impression.
What is the procedure for fire door testing?
Visual inspection covers condition and labeling, while functional testing covers controlled closing, latching, coordinator sequencing, and release or hold-open checks. Rolling doors need separate drop and reset testing. All of it should be performed safely by a qualified person.
Is there a legal requirement to inspect fire doors?
Requirements depend on your adopted building and fire codes, your occupancy type, and your local AHJ. NFPA80 is commonly incorporated into enforceable codes like the 2024 IFC, so verify what's adopted in your specific jurisdiction.
What are the key items to include in a fire safety audit checklist?
A broader fire safety audit covers fire door condition and operation, exits and egress routes, alarms, extinguishers, emergency lighting, sprinklers, records, and corrective-action tracking. Fire doors are one piece of a much larger audit scope.
What is a fire door inspection form?
It's the record used to identify each door, document every inspection point and its result, capture supporting photos, log deficiencies, note inspector details, and track corrective action through to completion. Without it, there's no proof the inspection happened at all.